
Creating a Stunning Farmhouse Beaded Chandelier: A Step-by-Step Guide
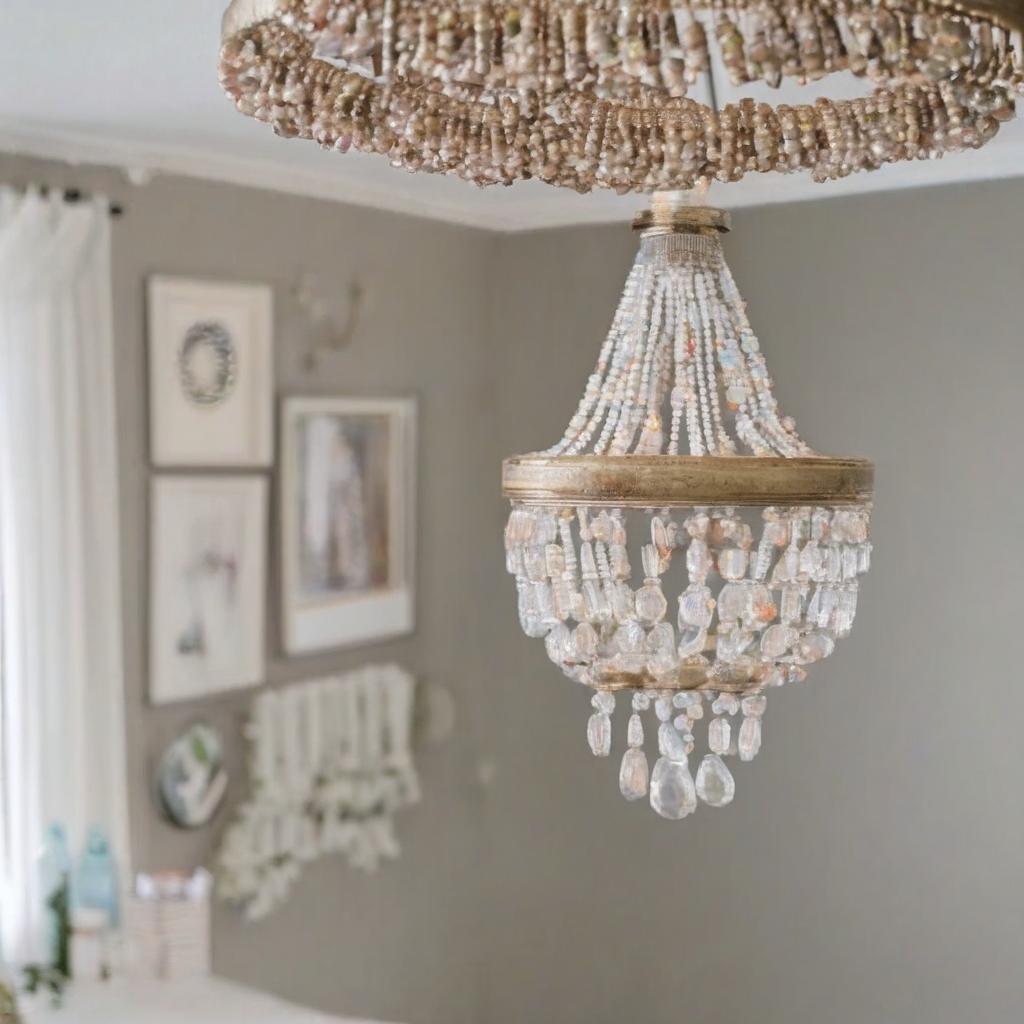
Have you ever thought about making your own chandelier? I hadn’t either, until I found myself drawn to the beauty of a wood beaded chandelier. The ones that caught my eye were not only gorgeous but also came with a hefty price tag, ranging from $400 to $3,000, depending on where you shop. The Pottery Barn chandelier I had my eye on cost $759, and I just wasn’t willing to shell out that kind of money.
In our previous home, knowing we would only be there for a few years, I wasn’t keen on changing out light fixtures, let alone spending that much on something that wouldn’t ultimately come with us. However, since we’re planning to stay in our new home for a while, I’m all in for changing light fixtures, and one of the first things I wanted to tackle was finding a beaded chandelier. But I still didn’t want to pay the premium. So, I did some digging and stumbled upon Shannon from Living with Ladas’ Instagram page. She had a gorgeous chandelier in her bedroom, and upon closer inspection, I realized it was a DIY project.
Getting Started: A DIY Beaded Chandelier Tutorial
Shannon’s tutorial on her blog was incredibly helpful in getting me started on my own project. I’m making a few tweaks along the way, so I’ll share my process with you here.
Step 1: Purchase Your Supplies
To make your own beaded chandelier, you’ll obviously need beads, and lots of them. I ordered all my beads from a supplier, and here’s the breakdown of what I needed:
- 12 packs of 300 10mm wooden beads
- 11 packs of 100 14mm wooden beads
- 8 packs of 100 16mm wooden beads
- 10 packs of 50 20mm wooden beads
- 11 packs of 30 25mm wooden beads
My total bead cost was $117. I did end up short on the 25mm beads, but the 11 packs above should have covered the total number of beads.
Other materials you’ll need include:
- Sewing needle with a large eye
- 2 18″ embroidery hoops
- 2 23″ embroidery hoops
- Cotton twine
- Scissors
- Wood glue
- Clamps
- Pendant lighting kit with a ceiling plate, chain, and 2 metal rods
- Heavy-duty zip ties
These materials cost me about $72 in total, bringing the grand total of this project to $191. Compared to the hundreds or thousands of dollar price tags I’ve seen on these, I’d say it was totally worth it.
Step 2: Sort and String Your Beads
To avoid getting overwhelmed, I sorted all my beads into bowls by size and labeled some hangers with exactly what strand and for what size hoop they were for. I then printed off diagrams from Shannon’s tutorial to help me follow the patterns.
Step 3: Create Your Bead Strands
I started by attaching my twine to my sewing needle with one single knot, leaving the twine attached to the roll. I strung up the beads for one strand, cut the twine, making sure to leave 6-8 inches on either side, and then tied each finished strand to its corresponding hanger.
Each set of 10 strands took me about 40-60 minutes to complete, depending on the level of distractions I had. I highly recommend stringing while you zone out watching a show or something, as this part is slow-moving.
Step 4: Start Tying Your Swoops on Your 18″ Hoop
Once I had all my strands ready, I started tying them to the 18″ hoop. One swoop is made up of one of each of your five sizes of strands. You’ll tie the shortest strand first, followed by the next size, and so on, until you have all five sizes together.
To tie, I looped the twine up and over the top of the hoop and double-knotted it at the bottom where the beads start. Once you have your first swoop tied, you’ll move to the right and overlap your first swoop with a second swoop, starting the left-hand side in the middle of your last hoop.
Step 5: Glue On Your Inner and Outer Hoops
Once you have all your swoops on your 18″ hoop and feel good about the spacing, take a minute to celebrate! Then, grab your other 18″ hoop pieces. You’ll need to glue the inner and outer hoops to the beaded hoop.
To do this, fit your adjustable hoop into the center of your beaded hoop, making sure it’s flush, and mark where it overlaps. Cut the piece so it will fit flush, then use wood glue to attach it. Clamp them together and let them dry.
Next, grab your second non-adjustable 18″ hoop and fit it around the outside of your beaded hoop. Cut it to size, apply wood glue, and clamp it in place.
Step 6: Start Making Strands for Your 23″ Hoop
Once your 18″ hoop is done, it’s time to start on your 23″ hoop. Repeat the process of creating bead strands, using 12 strands of each size.
Step 7: Cut Your Extra Strings
Once the glue dries, trim the extra strings that are hanging around. Don’t worry about getting it perfect – you won’t be able to tell if there are tiny pieces leftover.
Step 8: Install Your Metal Rods
Time to put the two hoops together! Once you’ve let your glue dry, place your 18″ hoop inside your 23″ hoop and cross your metal rods over top. Drill holes with a .25 drill bit, making sure to go all the way through the 18″ hoop but only through the first two hoop layers on the 23″ hoop.
Place one rod in through, then cross the other one over, manipulating the rod and hoop as needed to get them in tightly enough so they’ll stay put.
Step 9: Add the Lighting Kit
The final step is to add the lighting kit. I ordered a pendant lighting kit, which came deconstructed and ready to customize and install.
First, I held the chain and pendant inside the chandelier and marked where I wanted it to hang. I then secured the chain to the metal rods using heavy-duty black zip ties.
Next, I installed the light fixture, cutting the power to our dining room, connecting the wires according to the instructions, and securing it into place.
The Finishing Touches
I added a 100-watt Edison bulb to mine, but I might eventually grab a bulb splitter or a brighter bulb to create more light.
The only mini-issue I ran into was making sure the chandelier was balancing correctly and staying level. The zip ties definitely helped, and I was able to secure it into place.
And that’s it! I’m thrilled with how my beaded chandelier turned out, and I’m so glad I decided to take on this project.
If you have any questions on how to make your own beaded chandelier, feel free to leave a comment below or find me on Instagram, where I have the whole process documented in videos in my highlights.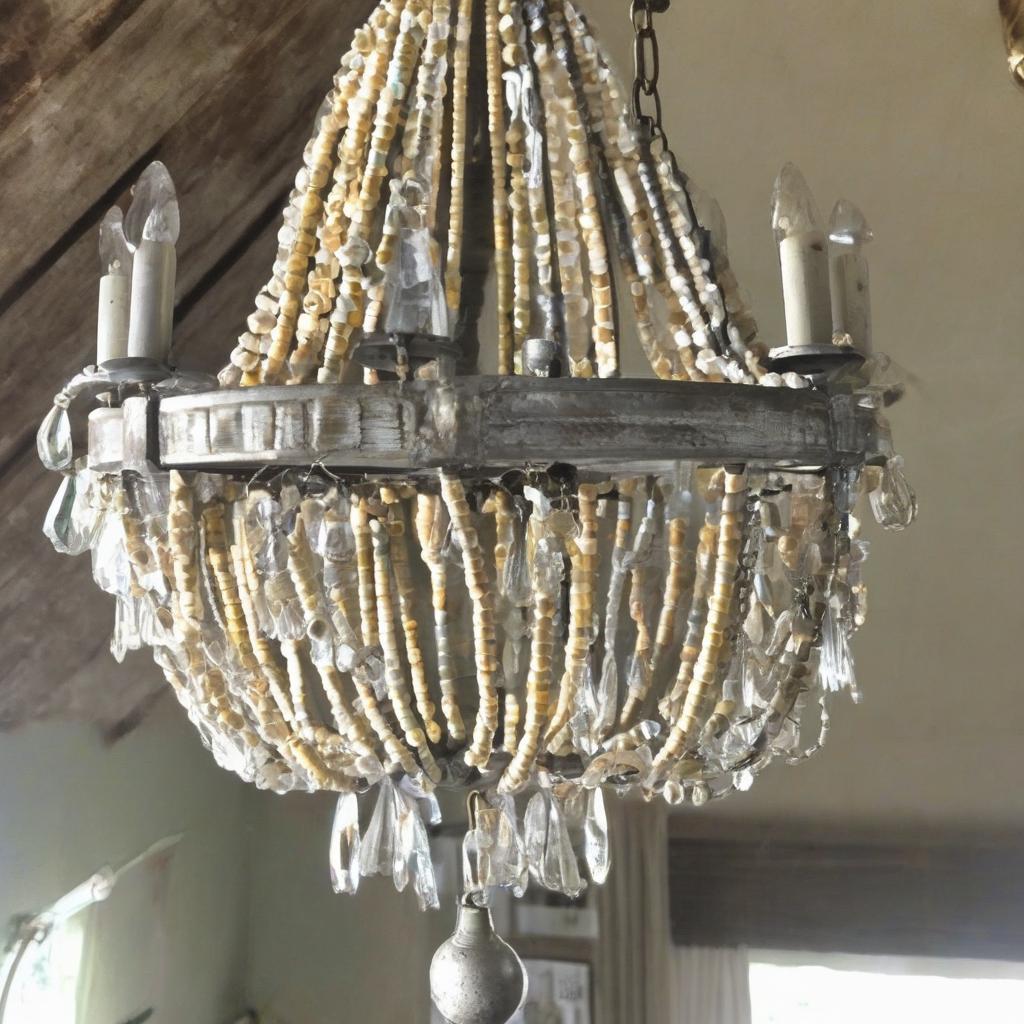
Frequently Asked Questions
What materials are required to make a beaded chandelier?
_Wooden beads, sewing needle, embroidery hoops, cotton twine, scissors, wood glue, clamps, pendant lighting kit, and heavy-duty zip ties._
How much does it cost to make a beaded chandelier?
_The total cost is approximately $191, which includes $117 for beads and $72 for other materials._
How long does it take to complete one set of 10 bead strands?
_It takes around 40-60 minutes to complete one set of 10 bead strands, depending on the level of distractions._
What type of lighting kit is recommended?
_A pendant lighting kit is recommended, which comes deconstructed and ready to customize and install._
How do you secure the chain to the metal rods?
_Heavy-duty black zip ties are used to secure the chain to the metal rods._
What type of bulb is used in the chandelier?
_A 100-watt Edison bulb is used, but a bulb splitter or a brighter bulb can be used to create more light._