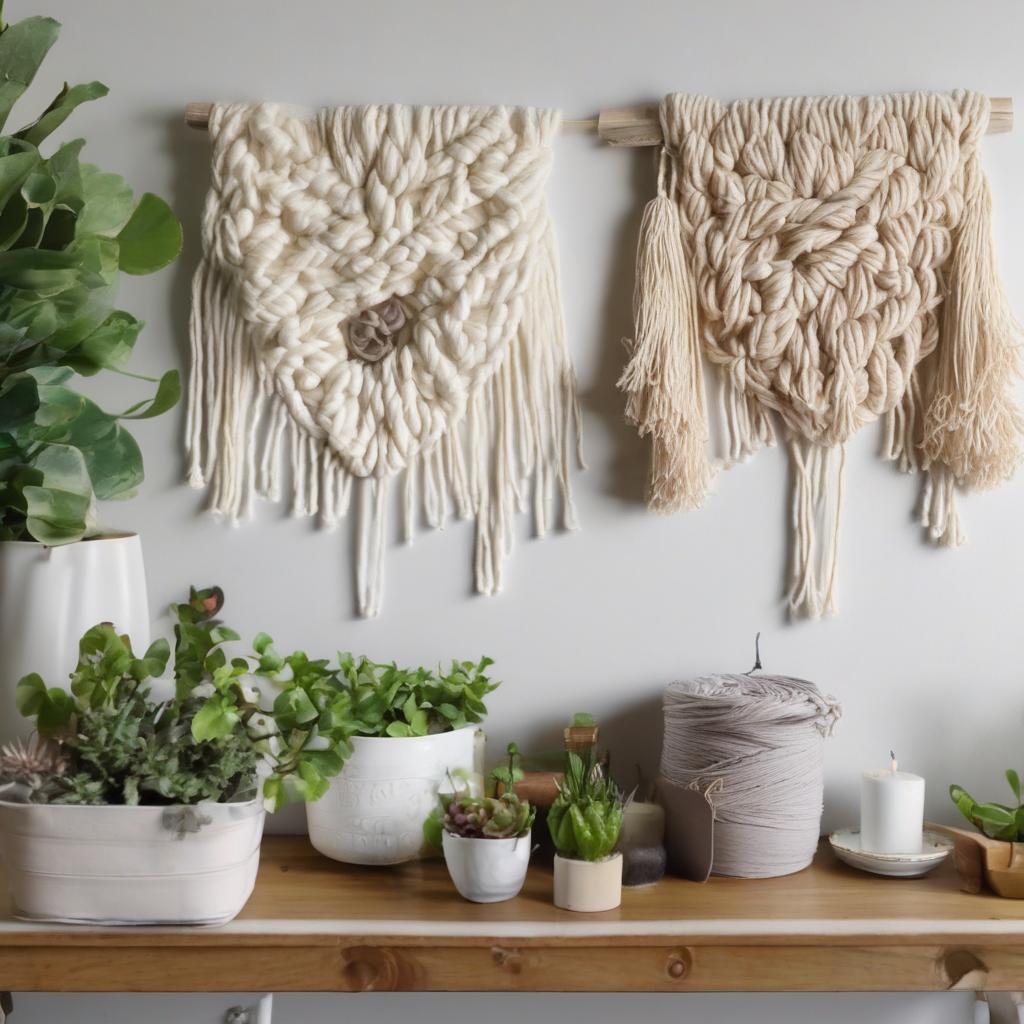
DIY Yarn Wall Hanging: A Budget-Friendly Boho Decor Project
As I worked on my 11-year-old neighbor’s bedroom makeover this week, I was determined to find a creative solution to fill one of her walls with a modern boho theme without breaking the bank. The result was a simple DIY yarn wall hanging that cost us less than $10! In this article, I’ll share our experience and provide a step-by-step guide on how to make your own easy and inexpensive yarn wall hanging.
The Challenge of Decorating on a Budget
My 11-year-old client had big ideas for her bedroom, but her budget was limited. Blank walls can be difficult to fill when you’re on a budget. Larger pieces are more expensive, and more affordable smaller pieces can often feel lost and out of proportion on a large wall. That’s why I was excited to discover a solution that added texture and color to the wall without costing much at all.
How to Make an Easy DIY Yarn Wall Hanging
This wall hanging was surprisingly easy to make, and you don’t need to be super crafty or skilled to create one. We made a large wall hanging, but I bet it would be quicker and even cheaper to make a smaller one. Here’s a short tutorial to get you started.
Gather Supplies
To make your own yarn wall hanging, you’ll need the following materials:
- Some kind of dowel, copper pipe, or even a branch/piece of driftwood. We used a 34 x 36 inch dowel which we found at a craft store for less than $2.
- Yarn in various colors. We used 4 different colors, and there was plenty left over to make another wall hanging! Note that if you purchase a yarn bundle, this project will cost you a bit more than $10, but you will have plenty of supplies left over for future craft projects!
- Tape measure
- Scissors
- Painters tape
- Twine to hang (not essential)
For your convenience, I’ve created an Amazon shopping list with all of the items you’ll need for this project.
Decide on Your Pattern
If you’re creating a symmetrical piece, you’ll need to plan out your design ahead of starting. Decide which order you want to use your colors and the width that each color section will be, and jot that down on a piece of paper. We came up with a symmetrical design with a large central neutral section, flanked with smaller sections of the brighter colors.
If you’re going with an asymmetrical design, then you can be more flexible with the design and figure it out as you go along. Whichever option you choose, you’ll want to think about what colors you want to use next to each other, and which colors you want to be more prominent in the design. You can vary the widths of each color section to add more visual interest.
It’s also worth considering the wall color of where you’re hanging it. My neighbor’s walls are a very pale gray, so we chose colors that would contrast nicely when it was hung up.
Cut, Tie, and Repeat…
This is the repetitive, monotonous part of the process, although I actually found it surprisingly therapeutic! Cut pieces of yarn that are double the length that you want your wall hanging to be. To attach them to the pole, fold a piece of yarn in half, put the folded end under the pole, poke the ends through the loop, and pull it tight.
We found that it was easier to cut lots of lengths of yarn at once, so that you can get into more of a rhythm of tying them. We worked with it laying flat on the dining room table, but you could also hang it on the wall and work vertically. If you’re following a design, keep measuring your sections with the tape measure as you go along to stay on track. Carry on tying pieces of yarn on until there are no gaps left on the dowel.
Trim into Shape
This works best if you hang it in place on the wall first. To hang it up, you can either tie a large length of twine or yarn to each end of the pole and hang it from a single nail, or you can put in two nails either side at an upward angle and rest the pole along the top.
You could either trim the yarn ends straight across, or into a symmetrical shape, or on an angle – it’s up to you! We decided on an inverted V for ours. It was more challenging than I was expecting to cut it evenly, but adding painters tape to the wall as a guide would have helped me out a lot.
The Benefits of a DIY Yarn Wall Hanging
This simple DIY yarn wall hanging is a great way to add some boho flair and pops of color into your home. It’s easy, inexpensive, and can be customized to fit your personal style. Plus, it’s a great way to use up leftover yarn and get creative with your decor.
Tips and Variations
* Use different colors and textures to create a unique and personalized design.
* Experiment with different shapes and patterns, such as a chevron or herringbone design.
* Add some extra flair with beads or other embellishments.
* Use a variety of yarn weights and types to create a more dimensional look.
More DIY Projects to Try
If you enjoyed this project, here are some more easy DIY and craft projects you might like to try:
- DIY Stenciled Doormat Tutorial
- DIY Paint Dipped Glass Vase
- Simple Minimalist Wreath Craft
- Resin Coasters for Beginners
Conclusion
This DIY yarn wall hanging is a fun and easy project that can add a touch of boho chic to any room. With just a few simple materials and some patience, you can create a beautiful and unique piece of wall decor that reflects your personal style. So why not give it a try? Grab some yarn and get creative!
Bedroom Makeover Reveal
As I mentioned earlier, this yarn wall hanging was part of a larger bedroom makeover project. If you’re interested in seeing the full reveal, be sure to check out my previous article on the project.
Additional Resources
If you’re looking for more DIY projects and craft ideas, be sure to check out my other articles and tutorials. I’ve got plenty of inspiration and guidance to help you get creative and make your own unique decor pieces.
Make it with Your Kids
One of the best things about this project is that it’s a great way to spend quality time with your kids. My 11-year-old neighbor was a huge help with this project, and it was a great way for us to bond and have some fun together.
Easy DIY Projects for Kids
If you’re looking for more easy DIY projects to do with your kids, here are a few ideas:
Decorating on a Budget
One of the best things about this project is that it’s incredibly budget-friendly. We were able to make this beautiful wall hanging for under $10, which is a fraction of the cost of a similar piece of wall decor.
More Budget-Friendly Decor Ideas
If you’re looking for more budget-friendly decor ideas, here are a few suggestions:
Repurpose and Upcycle
Another great way to decorate on a budget is to repurpose and upcycle items you already have at home. Get creative and think outside the box – an old jar can become a vase, and an old t-shirt can become a reusable bag.
Modern Boho Decor
The modern boho style is all about mixing and matching different patterns, textures, and colors. It’s a great way to add some personality and whimsy to your decor.
Key Elements of Modern Boho Decor
Some key elements of modern boho decor include:
Adding Texture and Interest
One of the best things about this yarn wall hanging is that it adds texture and interest to the wall. You can also add texture and interest with throw blankets, rugs, and pillows.
Easy DIY Projects for Your Home
If you’re looking for more easy DIY projects to try at home, here are a few ideas:
- DIY candle making
- Upcycled home decor
- Handmade soap and lotion
- Macrame plant hangers
Frequently Asked Questions
What materials are needed for the DIY yarn wall hanging?
_Dowel, yarn, tape measure, scissors, painters tape, and twine._
How much does the DIY yarn wall hanging cost?
_Less than $10._
Is the DIY yarn wall hanging easy to make?
_Yes, it’s surprisingly easy to make._
Can I customize the DIY yarn wall hanging to fit my personal style?
_Yes, you can use different colors and textures to create a unique design._
Is the DIY yarn wall hanging suitable for kids?
_Yes, it’s a great project to do with kids._
What is the modern boho style?
_A mix of patterns, textures, and colors with natural materials and vintage items._
How can I add texture and interest to my wall?
_Use a yarn wall hanging, throw blankets, rugs, and pillows._
Can I repurpose and upcycle items for decorating?
_Yes, it’s a great way to decorate on a budget._