
DIY Bathroom Mirror Frame: A Simple and Elegant Solution
Are you tired of looking at a plain, builder-grade bathroom mirror? Do you want to add a touch of elegance to your bathroom without breaking the bank? Look no further! In this article, we’ll show you how to create a beautiful DIY bathroom mirror frame without the hassle of dealing with pesky mirror clips.
The Problem with Mirror Clips
If you’ve ever tried to frame a bathroom mirror, you know how frustrating it can be to work around those plastic mirror clips. They’re usually in the way, and it can be difficult to get your frame to lay flat against the mirror. We’ve read many DIY tutorials that claim to have a solution, but often they’re complicated or just plain don’t work.
A Simpler Approach
In this article, we’ll show you a simpler way to create a DIY bathroom mirror frame without removing the plastic mirror clips. Instead of attaching the frame to the mirror, we’ll hang it over the mirror like a picture frame. This approach eliminates the need to deal with mirror clips altogether.
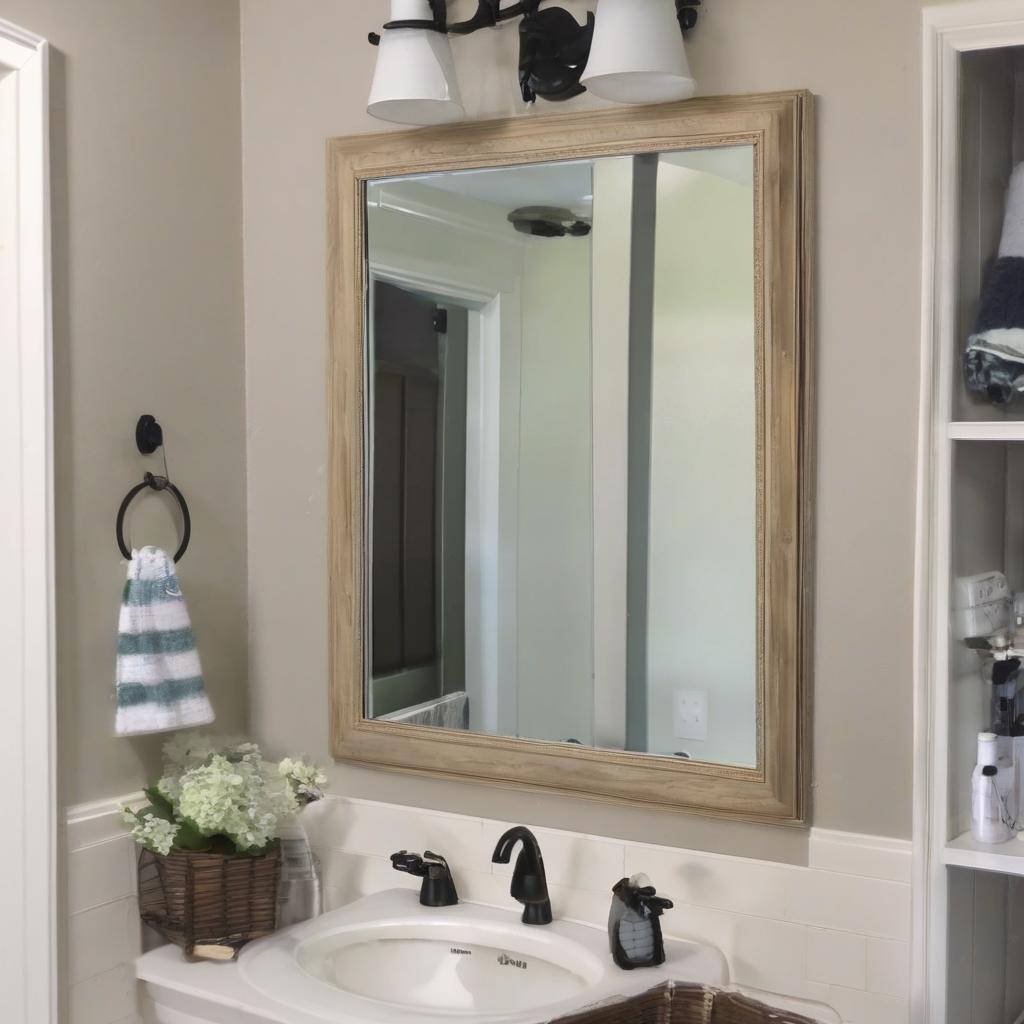
Before and After
Take a look at our before and after photos to see the transformation. Our builder-grade bathroom mirror was transformed into a stunning focal point with a simple DIY frame.
Supply List and Costs
Here’s what you’ll need to get started:
- 4 pieces of 1x4x8 wood cut to fit your mirror
- Wood stain or paint
- Staple gun
- Sawtooth hangers (2)
- L corner brackets (4)
- Black spray paint
- Screws for L brackets
The total cost of the materials will depend on the type of wood and stain you choose. For our project, the total cost was around $50.
Measuring Your Mirror
To ensure that your frame fits perfectly over your mirror, you’ll need to measure it carefully. Here’s how:
- Measure the width of your mirror and add 1 inch. This will be the length of your horizontal boards.
- Measure the height of your mirror, add 1 inch, and then subtract the width of the two 1x4x8 boards (about 7 inches). This will be the length of your vertical boards.
For example, if your mirror measures 28 inches wide and 42 inches high, your horizontal boards will be 29 inches long, and your vertical boards will be 36 inches long.
Building Your Frame
Now that you have your measurements, it’s time to build your frame. Here’s a step-by-step guide:
- Lay your boards out face down and fit them together.
- Use a staple gun to attach the boards together, starting with the horizontal boards.
- Carefully turn the frame over and stain or paint it.
- Attach L corner brackets to the frame using small screws.
- Stain or paint the edges of the frame.
- Nail sawtooth hangers to the top back of the frame.
Hanging Your Frame
Hanging your frame is the final step. Here’s how:
- Measure the width of your frame and mark the spot on the wall where you want to hang it.
- Screw two screws into the wall at the marked spot, about 1 inch apart.
- Hang the frame on the screws, making sure it’s level.
The Finished Product
And that’s it! Your DIY bathroom mirror frame is now complete. We were thrilled with the result, and it was surprisingly easy.
Variations and Tips
We created two frames using this method, one for our guest bathroom and one for our master bathroom. The only difference was that we skipped the wood glue for the second frame and started right with the staple gun. We also had a friend help us hang the larger frame.
Conclusion
Creating a DIY bathroom mirror frame is a simple and rewarding project that can add a touch of elegance to your bathroom. By hanging the frame over the mirror, you can avoid the hassle of dealing with mirror clips altogether. We hope this tutorial has inspired you to give it a try!
More DIY Projects
If you liked this project, be sure to check out these other DIY tutorials:
- 9 Builder Grade Bathroom Updates You Can Do on a Budget
- DIY Refinished Farmhouse Table
- DIY Dropcloth Curtains for Just $20
- DIY Chalk Painted End Table
- DIY Bathtub Tray
We’d love to see your finished project! Share a photo on Instagram and tag us @herhappyhome.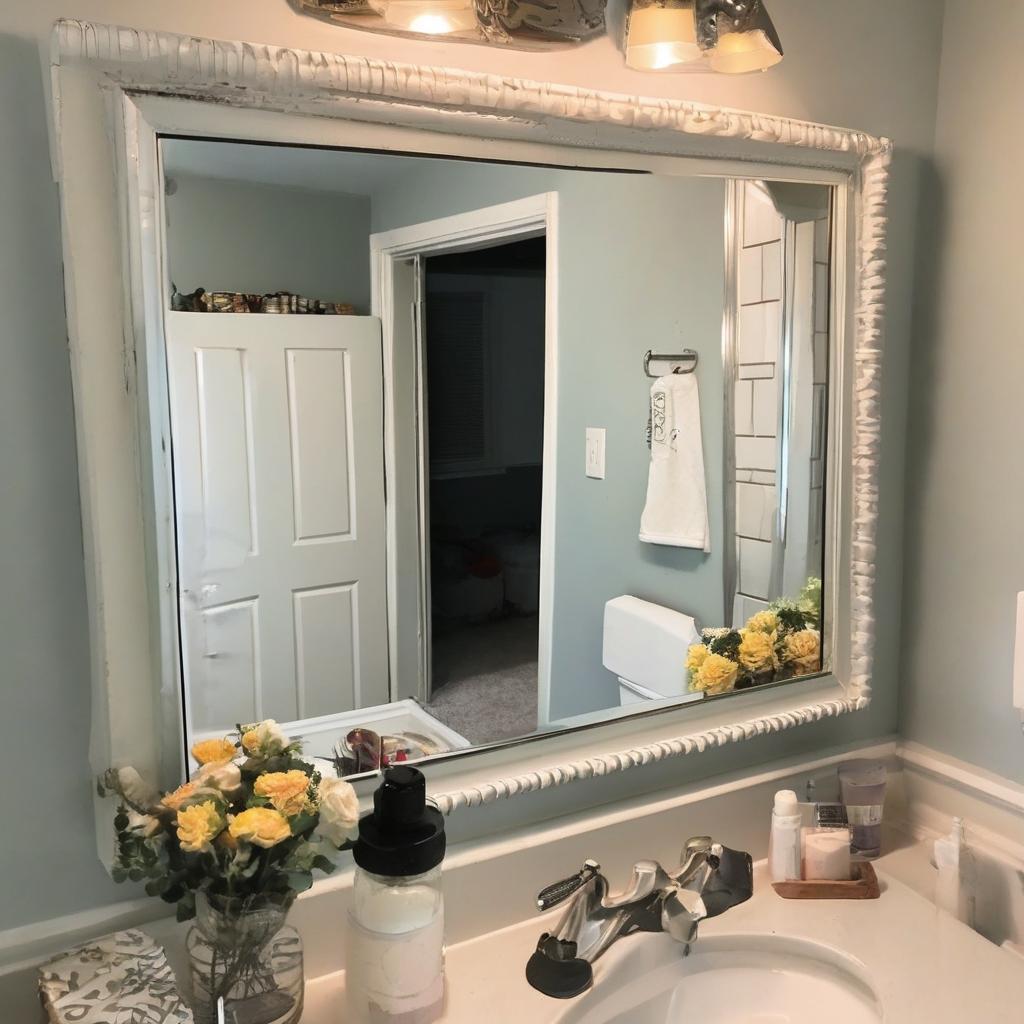
Frequently Asked Questions
What is the main idea of this DIY project? *_To create a beautiful DIY bathroom mirror frame without dealing with pesky mirror clips._*
What are the materials needed for this project? *_4 pieces of 1x4x8 wood, wood stain or paint, staple gun, sawtooth hangers, L corner brackets, black spray paint, and screws._*
How do I measure my mirror for the frame? *_Measure the width and height of your mirror, and adjust the measurements according to the given instructions._*
What is the total cost of the materials for this project? *_The total cost depends on the type of wood and stain chosen, but it was around $50 for the example project._*
How do I hang the frame over the mirror? *_Measure the width of your frame, mark the spot on the wall, screw two screws into the wall, and hang the frame on the screws._*
Can I customize the frame to fit my bathroom style? *_Yes, you can customize the frame by choosing different types of wood and stain or paint to match your bathroom style._*
Is this project suitable for beginners? *_Yes, this project is simple and rewarding, making it suitable for DIY beginners._*