
Coffee Table Flip Tutorial: Transforming an Old Coffee Table into a Brand New Focal Point
Are you tired of looking at that old, outdated coffee table taking up space in your home? Or maybe you’re in the market for a new coffee table but don’t want to spend a fortune. Well, you’re in luck because this coffee table flip tutorial is just what you need. In just a few simple steps, you can transform that old coffee table into a brand-new focal point using some free furniture that you can find online.
Finding the Perfect Coffee Table
I love finding furniture on the side of the road. I’m always amazed at what people will just get rid of if they think it’s broken. The truth is, a lot of modern furniture is not very well made or is made of particle board. Real raw wood furniture can be quite pricey. I’m all about finding fun DIY projects to keep me busy and to make old pieces look pretty again. When I find a furniture piece with good bones, I have to pick it up and try to work my magic on it.
The Coffee Table Makeover Project
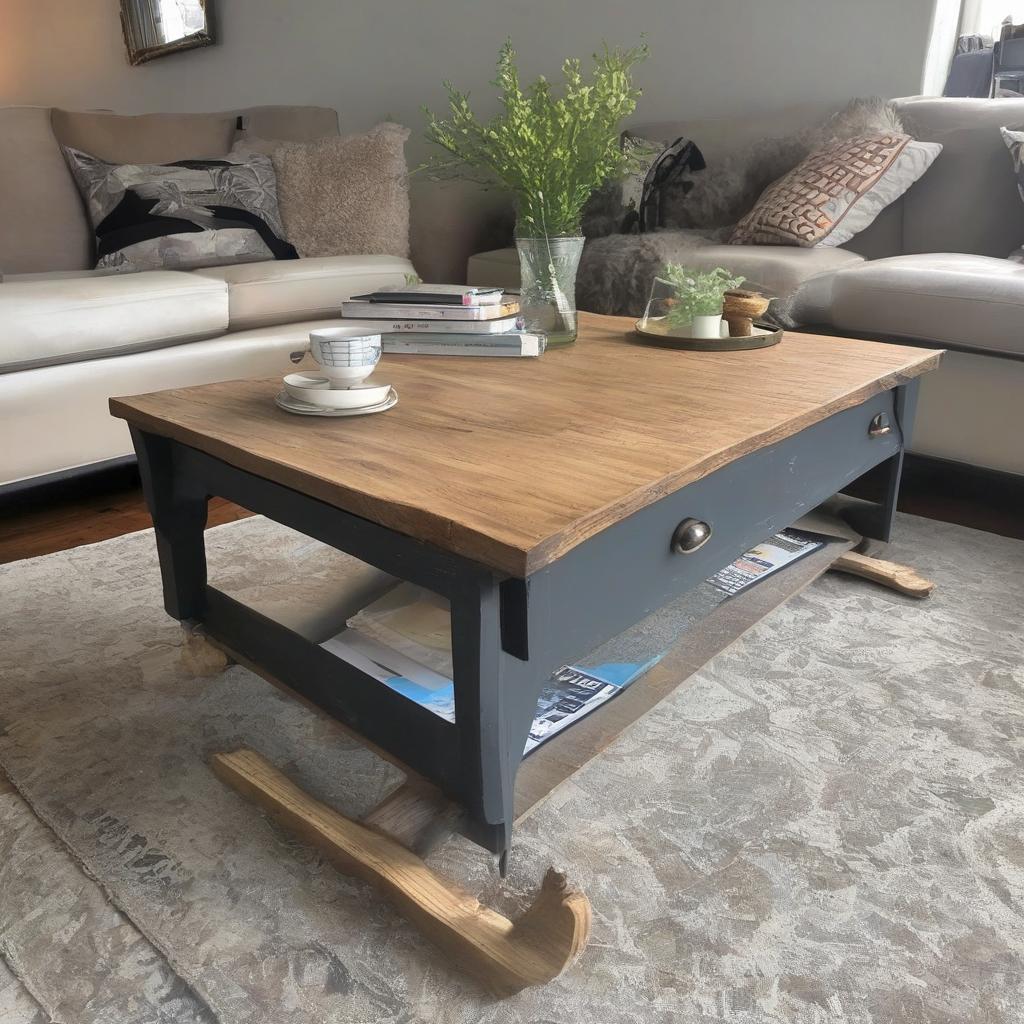
When I was working at my union a couple of weeks ago, I was on my lunch break and I stumbled upon this amazing Lane Wood Coffee Table from the 1970s-1980s. It was pretty beaten up and the bracing on the bottom was broken. Here is a little clip of what the coffee table makeover that I found in the San Fernando Valley looked like when I first got it.
The Before
Here is the before of the table with the leaves folded down of this outdated furniture. This table would be perfect in a small apartment home. This piece was pretty beaten up when I found it.
The Makeover Process
Step 1: Cleaning and Sanding
I started by cleaning the coffee table and then sanding the wood grain for a smooth finish. There were some rough spots that needed to be addressed before I could refinish, but overall, this was an easy enough process.
Step 2: Removing the Old Bracing
Then I had to decide if I was going to try and repair the bracing under the table or just cut it off. I made the decision to cut it off and I am so happy I did. I used my Ryobi electric cordless jigsaw to make this happen.
Step 3: Filling the Holes
After I removed the old bracing, I needed to use wood putty and a spatula to fill the holes in the legs.
Step 4: Painting the Table
After the putty dried and I completed a quick sanding, it was time to start painting the table with my chalk paint in the color Vintage. I like to try and use supplies I already have for random projects like this one.
Step 5: Adding Gold Accents
I got out my painters tape. I measured from the base of each leg up and marked it. I placed my painters tape at the 8 marker so I could create gold-dipped legs on the table. The paint I always love to use for gold pops of color is my Olympic Gold Modern Masters paint. I also decided the detailing on the side of the coffee table should also be painted gold so it didn’t get lost like it was before I painted it.
Step 6: Adding a Stencil
When I first saw this coffee table, it was in need of some TLC. The top looked ragged and dirty with just one coat on the paint job, so I decided to use my favorite stencil for a new look. But I ended up deciding on this French poem stencil that I used to make over my friend’s old dresser in 2016. I used a tray and a sponge roller, but this stencil is tricky. Paint dries in the openings of the stencil so easily, that I ended up having to go back over each word with a small artist’s paintbrush to clarify what it said.
Step 7: Adding a Layer of Wax
This coffee table makeover was easy but fun. I applied a layer of furniture wax to protect the paint and help the table last for years to come. The entire process was fairly simple, but it took some time and patience.
Step 8: The Final Result
After rubbing all the furniture wax in, I sat back and admired my work. The cool coffee table flip was COMPLETE. What do you think of how it turned out? Not going to lie, I am pretty obsessed with this transformation.
Finding and Transforming Free Furniture
If you’re on the hunt for some new pieces to spruce up your home, keep reading for some ideas on how to find and transform free furniture. Whether you’re drawn to sleek modern styles or cozy country decor, there’s a free piece of furniture out there waiting for you to give it a new life. So don’t wait, start browsing through those garage sales, online classifieds, and curbside piles today. Then turn around and flip projects like this on Facebook Marketplace.
Some Other DIY Coffee Table Makeover Ideas
- Finding Furniture For Free Curbside
- DIY Furniture Makeovers
- 10 Budget-Friendly Chic Coffee Tables Under $80
- DIY Faux Marble Coffee Table Makeover Tutorial
- Do it Yourself Coffee Table Makeover with Chalk Paint
Conclusion
I love DIY coffee table makeover projects like this one. It was a perfect addition to my living room and only took a couple of hours to make. If you liked this DIY coffee table makeover idea, you will also enjoy some of my other DIY projects. Make sure you follow me on Instagram, Pinterest, Facebook, my YouTube Channel, and TikTok for more ideas on how to style your newly revamped space.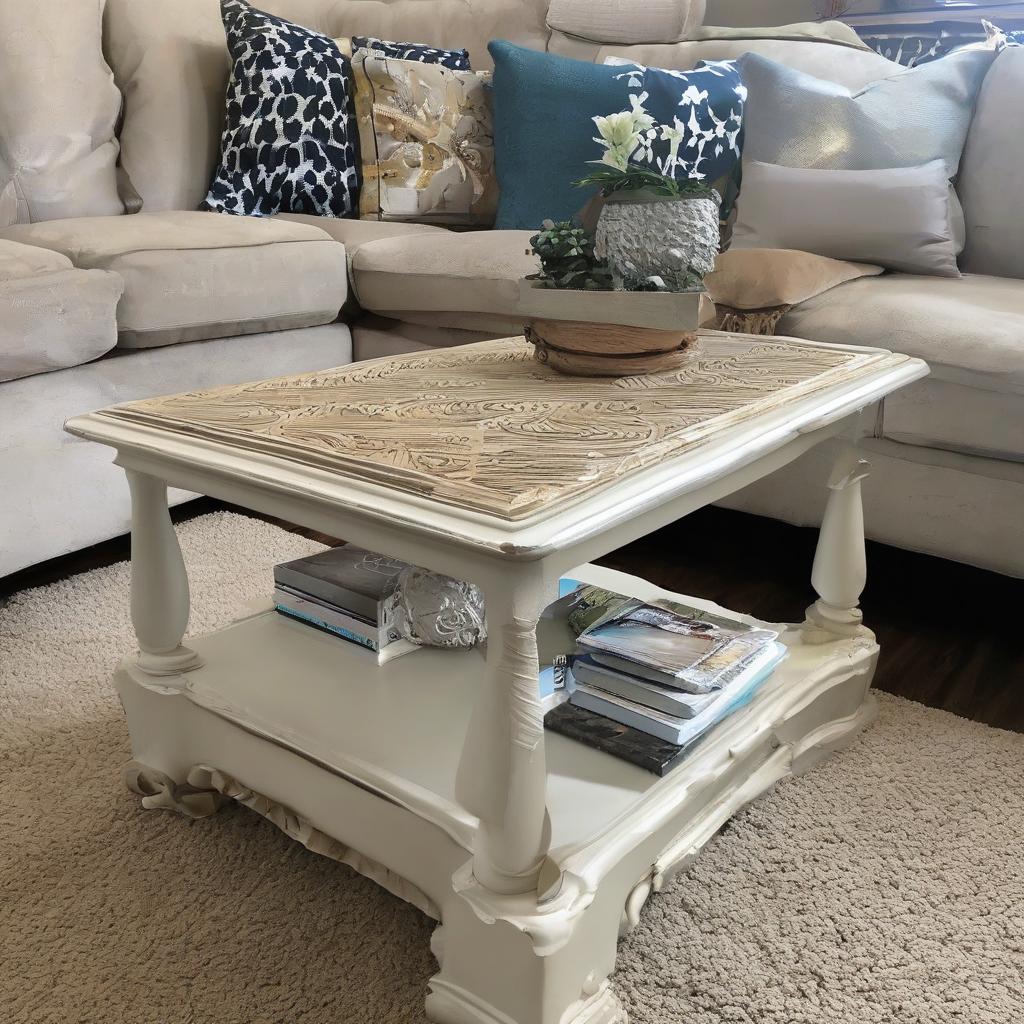
FAQs
What is the main idea of the coffee table flip tutorial?
Transforming an old coffee table into a brand-new focal point using simple DIY steps.
Where can I find old furniture for makeover?
You can find old furniture on the side of the road, online classifieds, garage sales, or curbside piles.
What are the steps involved in the coffee table makeover?
The steps include cleaning and sanding, removing old bracing, filling holes, painting, adding gold accents, applying stencil, and adding a layer of wax.
What kind of paint was used for the coffee table makeover?
Chalk paint in the color “Vintage” and Olympic Gold Modern Masters paint.
How long did the coffee table makeover take?
A couple of hours.
What is the final step in the coffee table makeover process?
Applying a layer of furniture wax to protect the paint.
Where can I find more DIY project ideas?
You can follow on Instagram, Pinterest, Facebook, YouTube Channel, and TikTok.