
Welcome to the Kitchen Renovation of Your Dreams
Welcome back! If you’re just showing up, you’re late. The party at my place started yesterday. Go catch up, then come on in – everyone’s in the kitchen, which is FINALLY, hopefully, a place you wanna be. Some of you just disobeyed the “go catch up” part of what I just said. Shame on you!
The Cliffs Notes
For our budget kitchen, while in school, I heard from other students that a professor had taught, you can’t renovate – truly renovate, not update – a kitchen for less than $20K. Challenge accepted. We barely made it under that mark. Once again, I’ll be sharing all the numbers later.
Before the Renovation
The First Impression
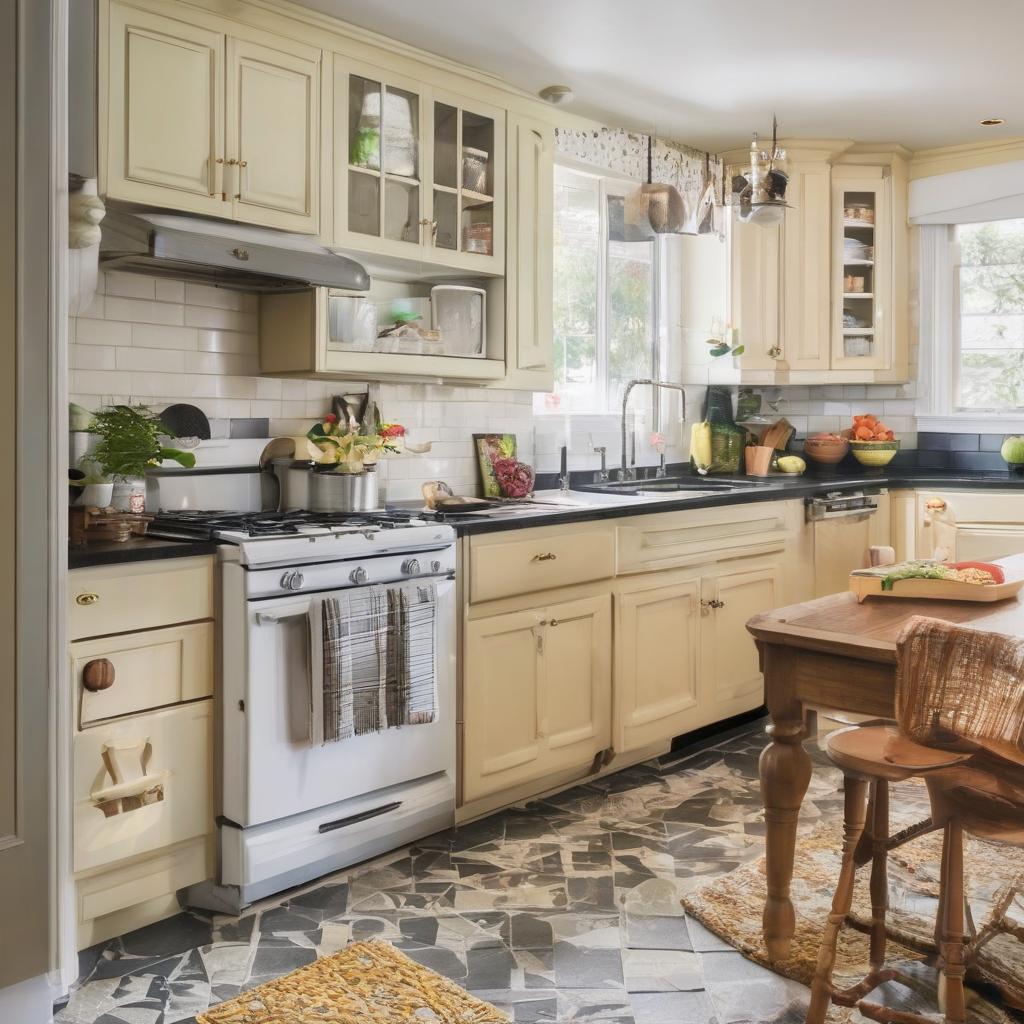
Barney Friends. This tragic little 4×10 galley kitchen was claustrophobic, unfunctional, and apparently painted purple by a 5-year-old. Beyond it, a laundry room 8×8 that opened into the tiniest 5×5 bathroom. More to come on that soon. I’m assuming this utility space is where past tenants shoved both their laundry and refrigerator because there was zero space for a fridge in the actual kitchen.
The Issues with the Old Kitchen
Everything in the room was sticky since there was no hood or ventilation, so clean up was fun. Redoing this tiny beast meant saving a second round of funds, so for years, the kitchen was a lingering project. But some changes had to be made early.
The Early Changes
When we bought the house in 2012, while we were still doing permitted work upfront – windows, plumbing, and electrical – it was time to commit to some long-term decisions. We couldn’t afford to push out exterior walls to really add space to this room, but I wanted to change the layout – open it up as much as possible.
The Initial Renovations
There wasn’t yet a design, so we knocked out some walls with help from our contractor and hoped for the best. Then, we lived in it for five years. It looked something like this:
The Few Good Things
The only thing good about the kitchen during this hold period, besides the memories we made, were a couple of these initial changes. We replaced the door that leads outside with a glass-panel option, which visually expands the space a ton. Then, inspired by the arched entry of the dining room, we opened up the claustrophobia-inducing doorways that divided the kitchen from the adjoining spaces.
Additional Changes
On top of turning oddly-divided tiny rooms into one now larger space, this added an extra dose of the home’s original character. Wiring for a line of IKEA pendants also helped visually connect the once-divided spaces. Other than these permitted upgrades, we basically knocked down half the cabinets to make room for a refrigerator, painted the remaining cabinets, and utilized a lot of IKEA storage solutions.
The Full Renovation
The 2016 Renovation
In 2016, it was FINALLY time to officially undertake this project. The renovation, including all supplies, appliances, and labor, cost $18K. For this round, the team included Rick (same contractor), Katie, and myself – with a friend popping in here and there. My mom was in chemo at the time, so our free labor was called away.
Our DIY Contributions
Anything we could do to limit Rick’s time. Demolition!!!! So fun. I took a jackhammer to the old floor tiles and now I want to be a demolisher when I grow up. The clean up/disposal was not so fun.
Haul Away Made Easy
There was a lot of lugging along the way, but we handled it ourselves thanks to Bagster. It’s mind-blowing what haul away can cost! I was really impressed with Bagster. We bought a 30 bag at Home Depot, filled it while it sat in our driveway, then called to have it picked up for less than a couple hundred bucks! We had to do this twice during the entire reno, but it cost a fraction of what dumpster rentals and other alternatives would’ve.
Assembling Cabinets
Adding to our DIY endeavors, Katie and I assembled ready-made cabinet boxes – not IKEA. Our contractor, Rick, secured them into place – balanced them once they were built – and then we stepped back in to install every door, knob, and pull – sacrificing a few additional years off our lives. Never again!
The Results
Maximizing Storage Space
Now, floor-to-ceiling cabinetry maximizes storage space and creates a clean, simple line where giant appliances used to jut out awkwardly. The added height, plus light reflecting off of white, makes the space feel bigger.
My Two Cents on White Cabinets
Yes, white kitchens can be boring, BUT white cabinets don’t have to mean a white kitchen – it’s what I love about white and other neutral cabinet options – the flexibility. At the time of this renovation, I was obsessed with the idea of green cabinets, but I worried green cabinets could end up being a very pretty, but more quickly-passing trend.
Cabinet Quality and Affordability
Since cabinets are one of the biggest ticket items in a kitchen reno, I’m unlikely to afford being able to swap them out anytime soon. Even painting – if done really well – is expensive, so I stuck to something classic, timeless, and neutral, knowing I can update the wall color and even backsplash tiles easily with each passing whim. Though maybe not show-stopping, it’s a lot harder to go wrong with white.
The cabinets weren’t IKEA, but were still incredibly affordable
We got them through Cabinet City. I’m pretty sure they’re from China, and I have mixed reviews as far as the quality. Now three years later, they still look great! But what made them extra affordable is we did pickups from the warehouse ourselves, so we saved on shipping costs.
Appliances and Layout
Our appliances were sourced from all over – Craigslist included – OF COURSE, new Bosch dishwasher score!. All machines are as compact as possible to avoid projecting into the 3-foot wide walking path and to maximize storage. Instead of going deep or wide with the fridge, we utilized height to gain additional cubic feet – 13 in total?. Enough space? For sure.
The Design Elements
Tile and Flooring
The white tile on the other side of the kitchen was chosen because it’s classic, and the original tile was square, so it’s a nod. The backsplash tile here was chosen as a nod to the home’s Mediterranean soul, and by 2016, I was into the graphic simplicity of black and white.
Other Design Choices
We kept the original nook and extended the wood flooring to make it feel bigger by unifying the rooms.
The Numbers
The Breakdown
Here’s how it all broke down. Full disclosure, a small portion of the general reno cost went toward the original kitchen changes in 2012, so add a couple thousand for that – but still, we are standing right at $20K.
Conclusion
A Job Well Done
It’s seriously beautiful! What a difference! The floors look so good, and opening up the walls did wonders. It all looks fabulous. The glass panel door to outside was such a good decision. It definitely made it feel more open to see the outdoors.
More Renovations to Come
Yay for beautiful, budget-friendly renovations!! Great work! Please give us more!
We’d Love to See More
Please give us more of these renovations that most of us can actually afford! Yes, please, please, please more realistic renovations on this blog and please without all the sponsored donations and unrealistic materials usage.
A Thank You
This series is wonderfully inspirational and realistic. Couldn’t agree more – this is actually doable! Yes, agree! I’m glad I’m not the only one to do a half-baked reno, before doing a full renovation. We’re on year 7 of modest updates, with this year getting flooring. 45 more years before a full gut job on my kitchen!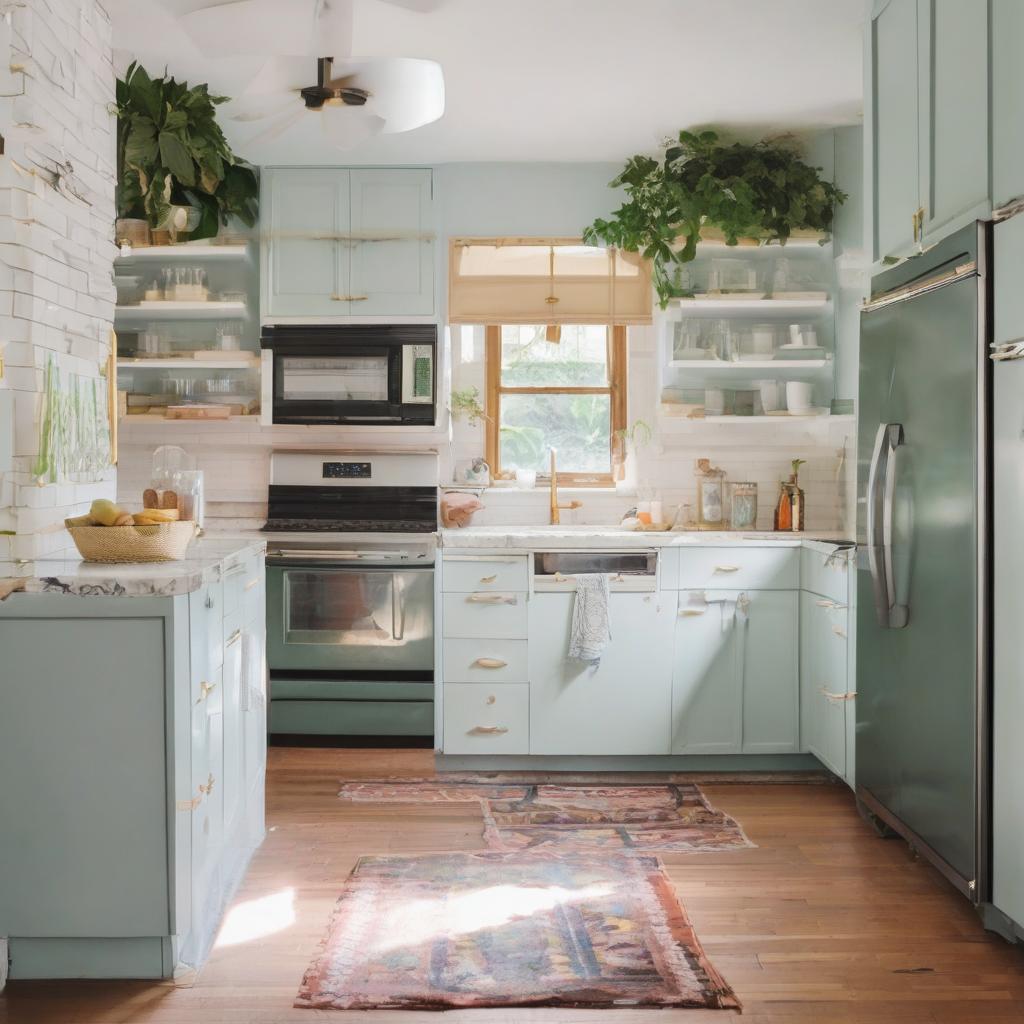
Frequently Asked Questions
What was the total cost of the kitchen renovation? *_$18K_*
How long did the renovation take? *_The exact duration isn’t specified, but it involved several stages over the years_*
What was the most challenging part of the renovation? *_Demolition and clean-up were challenging, especially with the use of a jackhammer_*
What type of cabinets were used in the renovation? *_Non-IKEA, ready-made cabinet boxes from Cabinet City_*
How was the storage space maximized in the kitchen? *_By using floor-to-ceiling cabinetry_*
Where were the appliances sourced from? *_Various sources, including Craigslist and local retailers_*
What was the reasoning behind choosing white cabinets? *_To create a timeless, neutral look that allows for flexibility in future updates_*
How was the haul away process handled during the renovation? *_Using Bagster, a service that provided affordable and convenient disposal of renovation debris_*
What were some of the early changes made to the kitchen before the full renovation? *_Replacing the door that leads outside with a glass-panel option, opening up doorways, and utilizing IKEA storage solutions_*
What was the inspiration behind the tile and flooring choices? *_Classic and simple designs, with a nod to the home’s Mediterranean style_*